Android Mobile Application Development Using SQLite | Realcode4you
- realcode4you
- 3 days ago
- 3 min read
SQLite
Android device has a database management system, SQLite database. To maintain data persistently in our device, we need to save the data into SQLite. Today, we will see how to insert, update, delete and select data in SQLite. We will understand the basic concept of table, and practice SQL (Structured Query Language) queries for inserting, updating, deleting, and selecting. Then, we develop a DB mobile application with menu. We also learn how to read data from text file.
Learning Outcomes
After this lesson, you will be able to:
Understand the basic concept of table in database
Learn SQL (Structured Query Language) queries for inserting, updating, deleting, and selecting data in SQLite
Get used to develop android mobile application using SQLite.
Develop an DB mobile application with menu.
Understand how to read data from text file.
Required files
For this lesson, you need following files in Canvas.
1. Tutorials
a. How to save and retrieve data in SQLite
b. Application with SQL queries
c. How to read text file
Table
Table is a container where data are saved in structured format with row and column. Database consists of tables, and Android device uses SQLite for database.

Table consists of rows (called records as well), and each row has columns. When we create a table, we define table schema that specifies column names (id, name, and point), type of each column (id: integer, name: text, point: real). In SQLite, “integer” means “int” type. “text” means “String” type. “real” means “float” or “double” types.
Primary key (id) is the column that identifies each row uniquely. So, the primary key should not be duplicate. To retrieve each column, we use get(). For example, to get the id (whose type is integer) in column 0, we use getInt(0). Likewise, to get the name and the point, we use getString(1) and getFloat(2) respectively.
We call the request to the table “SQL query”. For example, to retrieve all records from a table, we use “select from ” where “” means all columns. We will learn different types of SQL query.
Insert, update, delete, select data in SQLite
To insert, update, delete, select, create table, and delete table, we use SQL (Structured Query Language) query to database. The syntax of query is as follows.
[ Create table]

[ Insert]
The syntax of “insert” query is as follows.

Example)
insert into score values (1, “Danny”, 92.5)
insert into score values (2, “Sarah”, 90.8)
insert into score values (3, “Tom”, 100)
insert into score values (4, “Alice”, 80.5)

[ Select]
The syntax of “select” query is as follows.

Example)
Select * from score where point > 91
1 Danny 92.5 3
Tom 100.0
[ Update]
The syntax of “update” query is as follows.

Example)
update score set point=95 where id=1

[ Delete]
The syntax of “delete” query is as follows.

Example)
delete from score where id=1

[ Drop table]
The syntax of “drop table” query is as follows.

Example)
drop table if exists score
Practice
Please follow “How to save and retrieve data in SQLite” tutorial.
Develop an application with SQL queries
In this part, we will better understand how SQL queries can be used in mobile application by following MVC (Model-View-Controller) programming architecture. We will use the score table as follows.

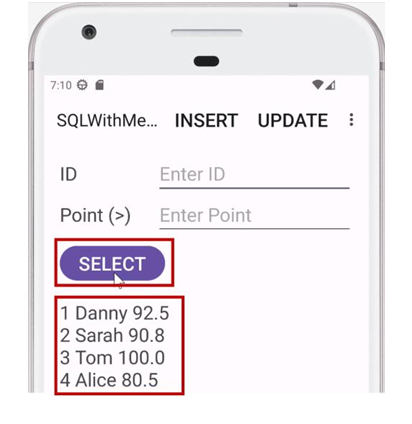
The application works as follows.
When we run application, “Main” screen is shown. Initially, score table does not exist.

We insert a score data (1, “Danny”, 92.5).

We select scores whose point is larger than 91.

We select a score whose id is 1.

We select all scores.
We update to 95 the score whose id is 1.

- We delete the score whose id is 1.

We delete table.

How to read text file
In this part, we understand how to read data from text file in Android program.
Suppose we read a text file line by line. Following figure shows steps to read the text file.

STEP1: Create an “assets” folder and put the text file in the folder.
STEP2: Create an input stream object through which data are read from the text file using “Context.getAssets().open()”.
STEP3: With the input stream, we create a BufferedReader object.
STEP4: Read line by line using “readLine()” until the end of lines.


Comments