How to create GitHub Account | Realcode4you
- realcode4you
- Dec 5, 2019
- 3 min read
1. Install Github Desktop and create a GitHub account
Download and follow the instructions here (1) to install Github Desktop (if it's not already installed). Once you've done that, create a GitHub account here (2). (Accounts are free for public repositories, but there's a charge for private repositories.)
Note:
2. Create a new repository on GitHub
A repository is where you project will be host on Github, so you can keep a history of changes (versions) of your project, and can share your code it with everyone, and allow team work on the same project. Think of a repository as if it was a folder on your Dropbox with your project, but with more functionalities for version control and team work.
To create a new repo on GitHub, log in and go to the GitHub home page. You should see a green '+ New repository' button:

After clicking the button, GitHub will ask you to name your repo and provide a brief description:

When you're done filling out the information, press the 'Create repository' button to make your new repo.
Note: you can also create a Repository using Github Desktop directly.

3. Cloning Your Repository
Now you can Clone your Github repository to your local machine, this will link your Github repository with your local repository, so that every change you make you project can be pushed to your online repo.
Just choose a directory in your local machine where you want to put your project files, and use the option Clone a repository on Github Desktop to link and synchronize your Github repo with your local repo.

4. Add a new file to your repo
Go ahead and add a new file to the project, using any text editor you like or running a touch command.
Once you've added or modified files in a folder containing a Git repo, git will notice that changes have been made inside the repo. But, git won't officially keep track of the file (that is, put it in a commit - we'll talk more about commits next) unless you explicitly tell it to.
touch test_file.txt
After creating the new file, you can check on GitHub Destop that your new file has been identified.

5. The staging environment, the commit, and you

One of the most confusing parts when you're first learning git is the concept of the staging environment and how it relates to a commit.
A commit is a record of what files you have changed since the last time you made a commit. Essentially, you make changes to your repo (for example, adding a file or modifying one) and then tell git to put those files into a commit.
Commits make up the essence of your project and allow you to go back to the state of a project at any point.
So, how do you tell git which files to put into a commit? This is where the staging environment or index come in. As seen in Step 3, when you make changes to your repo, like adding a file, git notices that a file has changed but won't do anything with it (like adding it in a commit). To add a file to a commit using GitHub Desktop, just add a Summary message to your commit and click in Commit to Master.
Now you can see you committed files in your repo’s history

Note: The staging environment, also called 'staging', is the new preferred term for this, but you can also see it referred to as the 'index'.
The message at the end of the commit should be something related to what the commit contains - maybe it's a new feature, maybe it's a bug fix, maybe it's just fixing a typo. Don't put a message like "asdfadsf" or "foobar". That makes the other people who see your commit sad. Very, very, sad.
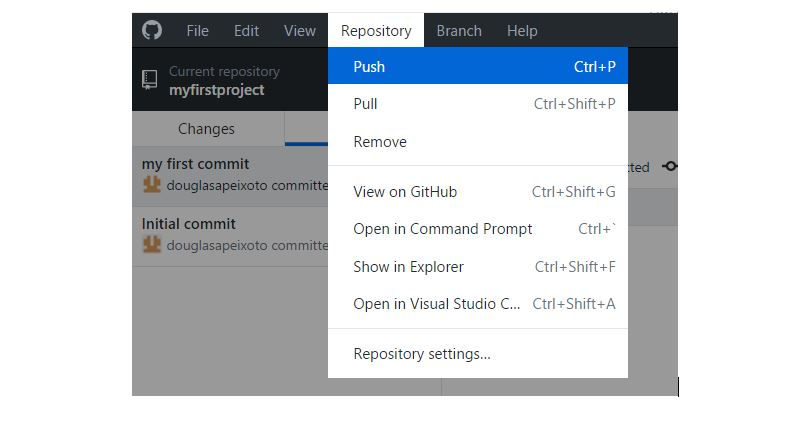
6. Push a branch to GitHub
Now we'll push the commit in your branch to your new GitHub repo. This allows other people to see the changes you've made, this will update all changes you made into your Github repository. To push changes onto a new branch on GitHub Desktop, just go to Repository -> Push.
And that’s all folks, now you can see your changes on your Github repository.

Now it is completed if you have any query or need help related to GitHub then you can contact us directly at <realcode4you>, or comment below section.
We also provding assignment and web assignment help services if you need any assingment help related to below link then contact us also.
<Realcode4you> Assignment Help
<Realcode4you> Web Assignment Help
Comments